Showing posts with label organic. Show all posts

Tuesday, August 23, 2011

Where Have I Been & Where Did You Go? (A Pre-View of the Next Few Blogs)

Just Last Week

The other day, it dawned on me, I haven't blogged in over 10 months.  Wow!  Where did the time go?  Our family has been GO-GO-GO and the time flew by, almost at the speed of light.
Joplin, MO July 1011


Joplin, MO July 2011 - Just the Fireplace Remains
Hmmmmm...where to start?

Last fall, there was the whole put-the-garden-to-rest thing & I taught myself to knit.  We had alot of snow, feet and feet.  There was the bout with mild-depression (a.k.a. Winter Blues).  I expanded the garden BIG TIME.  Canning, canning & more canning.  The desert for two weeks.  Haiti in March.  Our son did a mission trip to Costa Rica.  A family mission trip to Joplin, MO to help with post-tornado relief.  A new ministry for me coupled with another trip to Haiti in October 2011.  Whew!  Did I forget anything?  Oh yah, maybe a new home, one with much more land for me to garden/cultivate.  But Boy, she's a real fixer-upper.
All Organic - Kosher Dills, Yellow Boy (Tomatoes) & Red Boy

Every new gardening and canning was well photo documented, so I could blog and share what I have learned.  Somehow, the time just slipped thru my fingers and the blogging never happened.  I am praying that all changes rather soon.  I have alot to share...

Mixed Bells


This Year's Sexy Jalapenos

Monday, October 11, 2010

Jalapeno Jam Anyone? (With How-To Video)


So, what does one do with over 900 jalapenos?  Make jam!  Well, not with all of them, just some.  The last peck of peppers from my organic garden was sitting on the counter last night and they were screaming to be processed.  The teen was rather adamant that she needed more jam.  I smelled an opportunity.  An opportunity for a How To video.  So here goes... Let me know what you think, let your voice be heard.


1 LB Jalapenos

This recipe makes about 9 jars of jam (8 oz. size jars).
Some of the Basics

Ingredients

  • 1 LB Jalapenos
  • 2 Cups Apple Cider Vinegar
  • 6 Cups sugar
  • 1 Box Pectin (Powder)
Before starting, make sure your jars are clean and ready to receive this yummy jam.

Process

  • Fill your canning pot with water and get it started boiling.  We do this first because it can take a while for the water to boil.
  • De-seed the jalapenos and process in food processor.  Sometimes it helps to add up to 1/4 cup of the apple cider vinegar to the jalapenos in the food processor.
  • In a large pot combine; jalapenos, apple cider vinegar and pectin.  Bring this to a full rolling boil.
  • While the jam is getting hot, place the jar lids (in their rings) in hot water.  This will soften the rubber seals and get them ready for the canning process.
  • When the jalapeno mixture has come to a full rolling boil, add the 6 cups of sugar and stir until fully dissolved.  Bring to a full rolling boil.
  • After the jam has come to a boil that can not be stirred down, set the timer for 4 minutes. Keep stirring!
  • After the four minutes, turn off the burner and ladle the hot jam into the jars, leaving 1/2 inch head space.
  • Adjust two piece lid/ring (finger tight) and place in boiling water bath.
  • Process for 10 minutes then remove from canner.  Place the hot jars on a towel to cool.
  • When the lids have "snapped", this indicates that the jar is sealed.  Remove ring.
 Try not to disturb the jam too much for the first 24 hours, this will allow the jam to set properly.  If after any jars have not sealed, reprocess them for another 10 minutes.
    Snack Time!
    Enjoy this jam with peanut butter or pour it over a brick of cream cheese and serve with crackers or tortilla chips!!  Leave a comment, how do you like your jalapeno jam served?

    Wednesday, September 29, 2010

    Raised Beds & Garlic, Totally Organic

    Garlic Waiting To Go In The Ground
    I mentioned how much I love flavor right?  Garlic is a must for cooking around here, we all love it.  Nothing tastes better than fresh goodness grown in my own back yard and that should include my favorite ingredient, right?  I always wanted to grow my own garlic, but it was my husband who actually tipped the scales in the direction of expanding my gardening skills.

    People tend to leave alot of stuff on airplanes, the most common being magazines.  If the hubby finds one he thinks might strike my fancy, he brings it home.  Last month, he brought home the August/September issue of "Organic Gardening".  The feature article was, "Great Garlic, Our know-and-grow guide to success".  That coupled with  the stunning photo on the cover had me absolutely burning to make a raised bed and grow some garlic.  It was killing me, but I actually did wait until the appropriate time to plant and that time is now!!
    Simple Frame & Freshly Turned Soil

    I must be completely honest here and let you know, today is the first time I have ever done this.  The project was rather easy and I had alot of fun playing in the dirt.  Because garlic needs plenty of drainage, a raised bed garden is the best choice.  I started by making a simple frame (6'x2'), using 2x and four corner brackets.  This part took around 10 minutes and that included "measure twice, cut once".  I love playing with the hubby's power tools!

    Next, mark out the area of the garden.  For this, I set the frame where the raised bed will live and spray painted the inside outline of the frame.  Once that is done, set the lawn mower to the lowest setting and scalp that grass.  (Move the frame first)  After the grass is shaved, use a deep shovel to cut the soil and turn over the clumps of sod.  I did break the larger clumps into much smaller clumps and move the dirt around until it was close to level.  Return the frame to its intended spot and make sure all the required soil has been turned.
    The Larger Garden Transitioning for Winter
    At this point I paused the bed raising to mow the front yard next door.  Now before you go nominating me for sainthood, I must  disclose that my motive was purely selfish.  I wanted their yard clippings.  With the cooler weather and the rain every couple of days, no one on my street has mowed in about two weeks.  I actually mowed our lawn yesterday and used the yard waste (grass/leaves) to prep a portion of the larger veggie garden for winter.  Problem = I needed more organic matter.  Compost or composted manure should be the first choice here but, my compost is not ready and I did not have time to get manure from the stables this morning.  BIG thanks to R & M next door for not having cut the grass this week, you saved my bacon.  The organic matter gets those worms rather excited  and they will begin doing their thing with big smiles on their happy little faces.


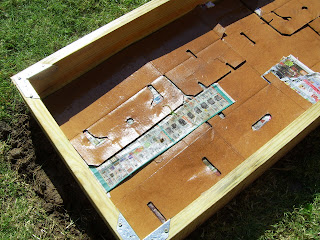
    Cardboard & Newspaper
    I dumped the yard clippings from next door into the frame, smushed them down and watered well.  This layer was around 4" deep.  This next layer is VERY important, it will keep the turned sod (grass) from growing up into the raised bed.  Place a thick layer of overlapping cardboard over your organic matter.  If it is necessary use newspaper to fill in any open spots.  Once again, water well.  Give that paper a good soaking!


    Organic Matter & Top Soil


    After the wet cardboard, another 4" layer of the clippings from next door.  (Compost, composted manure, kitchen scraps, grass clippings, dead leaves and/or a combination of any of the above would be great here.)  The final layer in our raised bed is the top soil.  I did not have any handy so, I purchased some.  I used four, 40 lb bags.  They were rather cheap, only $1.97 each.  This concludes the building of the raised bed!


    Lines to Plant By

    Now for the garlic!  
    Separate the cloves from the bulb, leaving the paper on each individual clove.  Choose only the largest, blemish free cloves for planting.  Each clove should be planted right side up, 4" to 6" apart with 12 inches between rows.  For my zone (zone 6), the cloves need to be planted 4" to 6" deep.  (Zones 7 or warmer, only 2" to 4" deep.)  

    Happy Little Cloves

    Top the soil off with a 2-to-3-inch layer of straw.  This will help to keep the soil moist and possible winter weeds in check.  Water well, then keep those puppies watered for the next three weeks to stimulate root growth.  Now all we have to do is wait until summer to harvest.  Can I wait that long? Do I have a choice?

    Start to finish, the entire project took only 2 1/2 hours to complete.  This includes; mowing the neighbor's front yard and stoping to have a chat with the male child when he got home from school, then later, another chat with the teen.  Not bad for an afternoon's work.
    All Tucked In For a Long Winter's Nap

    Tuesday, September 21, 2010

    Plenty of Peppers & Simple Humus

    Homegrown & Organic

    As far as the veggie garden goes, this year will be remembered as the Year of Peppers. Pretty, plentiful, perfect, peppers.  There are Bells, Sweet Banana & Jalapenos.  Everything organic!  Of these three, the jalapenos are the show stoppers.  All summer long they have been producing like mad.  So the curious, control freak, numbers person in me has been keeping count and as of the last picking session, we were at just over 700 jalapenos.  They all came from only nine small plants, none standing over two feet tall.  With a large measure of self control  I have managed to not pick any peppers for about two weeks.  The curious side of me wanted to see how big these suckers might get.  They actually got pretty big.  This afternoon I took a stroll thru the garden and decided that tomorrow I really need to do some harvesting.  There are somewhere between 80 and 100 jalapenos (not to mention the numerous buds), about 20 bells & approximately 40 large, fragrant, sweet banana peppers all of which are begging to be picked.  

    Peppers Salad with Humus & Jalapeno Mayonnaise 
    So, when it came time for dinner this evening there was no question about what I was having.  An incredible salad teaming with peppers from my garden topped with some of that yummy humus I made yesterday (just after I made the mayo) and a dollop of my very own jalapeno mayonnaise.  Believe it or not, this filled me up.  For this single serve salad;
    • 2 large sweet banana peppers
    • 1 large bell pepper
    • 1 small tomato
    • 2 medium mushrooms
    The mushrooms were the only thing that did not come from my garden.
    Sweet Banana Peppers

    My Simple Humus
    • 1 (29 oz) can Garbanzo Beans, mostly drained
    • 1 (7 oz) jar Green Olives, not drained
    • 1/2 c Tahini 
    • 3 large cloves Garlic
    • Spices and Herbs to taste  
    Place the tahini, olives (with juice), garlic & herbs/spices of choice in the food processor and blend well.  Next, add the mostly drained garbanzo beans and blend until the humus reaches the constancy you like best.  Because the olives and juice are used, you should taste the humus before any salt is added.

    Experiment with different herbs and spices, go with what sounds yummy that day.  Yesterday I used some jalapenos from the garden, sometimes it is crushed red peppers.  Once, it was rosemary, freshly picked moments earlier.

    Naturally, this is a GF (gluten free) food!  Yummy & guilt free, I eat alot of it.  It also makes a great substitute for mayo or a great dip for fresh, raw veggies.