Wednesday, September 29, 2010

Raised Beds & Garlic, Totally Organic

Garlic Waiting To Go In The Ground
I mentioned how much I love flavor right?  Garlic is a must for cooking around here, we all love it.  Nothing tastes better than fresh goodness grown in my own back yard and that should include my favorite ingredient, right?  I always wanted to grow my own garlic, but it was my husband who actually tipped the scales in the direction of expanding my gardening skills.

People tend to leave alot of stuff on airplanes, the most common being magazines.  If the hubby finds one he thinks might strike my fancy, he brings it home.  Last month, he brought home the August/September issue of "Organic Gardening".  The feature article was, "Great Garlic, Our know-and-grow guide to success".  That coupled with  the stunning photo on the cover had me absolutely burning to make a raised bed and grow some garlic.  It was killing me, but I actually did wait until the appropriate time to plant and that time is now!!
Simple Frame & Freshly Turned Soil

I must be completely honest here and let you know, today is the first time I have ever done this.  The project was rather easy and I had alot of fun playing in the dirt.  Because garlic needs plenty of drainage, a raised bed garden is the best choice.  I started by making a simple frame (6'x2'), using 2x and four corner brackets.  This part took around 10 minutes and that included "measure twice, cut once".  I love playing with the hubby's power tools!

Next, mark out the area of the garden.  For this, I set the frame where the raised bed will live and spray painted the inside outline of the frame.  Once that is done, set the lawn mower to the lowest setting and scalp that grass.  (Move the frame first)  After the grass is shaved, use a deep shovel to cut the soil and turn over the clumps of sod.  I did break the larger clumps into much smaller clumps and move the dirt around until it was close to level.  Return the frame to its intended spot and make sure all the required soil has been turned.
The Larger Garden Transitioning for Winter
At this point I paused the bed raising to mow the front yard next door.  Now before you go nominating me for sainthood, I must  disclose that my motive was purely selfish.  I wanted their yard clippings.  With the cooler weather and the rain every couple of days, no one on my street has mowed in about two weeks.  I actually mowed our lawn yesterday and used the yard waste (grass/leaves) to prep a portion of the larger veggie garden for winter.  Problem = I needed more organic matter.  Compost or composted manure should be the first choice here but, my compost is not ready and I did not have time to get manure from the stables this morning.  BIG thanks to R & M next door for not having cut the grass this week, you saved my bacon.  The organic matter gets those worms rather excited  and they will begin doing their thing with big smiles on their happy little faces.


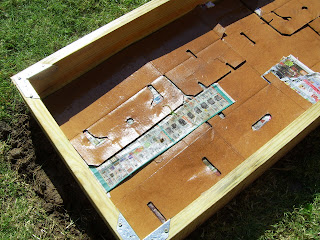
Cardboard & Newspaper
I dumped the yard clippings from next door into the frame, smushed them down and watered well.  This layer was around 4" deep.  This next layer is VERY important, it will keep the turned sod (grass) from growing up into the raised bed.  Place a thick layer of overlapping cardboard over your organic matter.  If it is necessary use newspaper to fill in any open spots.  Once again, water well.  Give that paper a good soaking!


Organic Matter & Top Soil


After the wet cardboard, another 4" layer of the clippings from next door.  (Compost, composted manure, kitchen scraps, grass clippings, dead leaves and/or a combination of any of the above would be great here.)  The final layer in our raised bed is the top soil.  I did not have any handy so, I purchased some.  I used four, 40 lb bags.  They were rather cheap, only $1.97 each.  This concludes the building of the raised bed!


Lines to Plant By

Now for the garlic!  
Separate the cloves from the bulb, leaving the paper on each individual clove.  Choose only the largest, blemish free cloves for planting.  Each clove should be planted right side up, 4" to 6" apart with 12 inches between rows.  For my zone (zone 6), the cloves need to be planted 4" to 6" deep.  (Zones 7 or warmer, only 2" to 4" deep.)  

Happy Little Cloves

Top the soil off with a 2-to-3-inch layer of straw.  This will help to keep the soil moist and possible winter weeds in check.  Water well, then keep those puppies watered for the next three weeks to stimulate root growth.  Now all we have to do is wait until summer to harvest.  Can I wait that long? Do I have a choice?

Start to finish, the entire project took only 2 1/2 hours to complete.  This includes; mowing the neighbor's front yard and stoping to have a chat with the male child when he got home from school, then later, another chat with the teen.  Not bad for an afternoon's work.
All Tucked In For a Long Winter's Nap

Tuesday, September 21, 2010

Plenty of Peppers & Simple Humus

Homegrown & Organic

As far as the veggie garden goes, this year will be remembered as the Year of Peppers. Pretty, plentiful, perfect, peppers.  There are Bells, Sweet Banana & Jalapenos.  Everything organic!  Of these three, the jalapenos are the show stoppers.  All summer long they have been producing like mad.  So the curious, control freak, numbers person in me has been keeping count and as of the last picking session, we were at just over 700 jalapenos.  They all came from only nine small plants, none standing over two feet tall.  With a large measure of self control  I have managed to not pick any peppers for about two weeks.  The curious side of me wanted to see how big these suckers might get.  They actually got pretty big.  This afternoon I took a stroll thru the garden and decided that tomorrow I really need to do some harvesting.  There are somewhere between 80 and 100 jalapenos (not to mention the numerous buds), about 20 bells & approximately 40 large, fragrant, sweet banana peppers all of which are begging to be picked.  

Peppers Salad with Humus & Jalapeno Mayonnaise 
So, when it came time for dinner this evening there was no question about what I was having.  An incredible salad teaming with peppers from my garden topped with some of that yummy humus I made yesterday (just after I made the mayo) and a dollop of my very own jalapeno mayonnaise.  Believe it or not, this filled me up.  For this single serve salad;
  • 2 large sweet banana peppers
  • 1 large bell pepper
  • 1 small tomato
  • 2 medium mushrooms
The mushrooms were the only thing that did not come from my garden.
Sweet Banana Peppers

My Simple Humus
  • 1 (29 oz) can Garbanzo Beans, mostly drained
  • 1 (7 oz) jar Green Olives, not drained
  • 1/2 c Tahini 
  • 3 large cloves Garlic
  • Spices and Herbs to taste  
Place the tahini, olives (with juice), garlic & herbs/spices of choice in the food processor and blend well.  Next, add the mostly drained garbanzo beans and blend until the humus reaches the constancy you like best.  Because the olives and juice are used, you should taste the humus before any salt is added.

Experiment with different herbs and spices, go with what sounds yummy that day.  Yesterday I used some jalapenos from the garden, sometimes it is crushed red peppers.  Once, it was rosemary, freshly picked moments earlier.

Naturally, this is a GF (gluten free) food!  Yummy & guilt free, I eat alot of it.  It also makes a great substitute for mayo or a great dip for fresh, raw veggies.

Monday, September 20, 2010

Fresh Mayonnaise

This is not staged, the fridge actually looks like this.
There is something rather satisfying about opening the fridge and seeing jars and jars of your own handy work.  Applesauce, pickles, mayo, salsa, hummus, guacamole...  This morning I had a bee in my bonnet and ended up making several condiments.  The first on the list was mayonnaise.  Yummy, fresh, somewhat spicy, homemade...

My jalapenos
Mayonnaise is one of those things I always wanted to make but was way too chicken to try.  There is no real reason why, I just got wussy.  Then, in July, the teen and I were watching reruns of Alton Brown's "Good Eats" on the Food Network and wouldn't you know it, the entire episode was on making mayonnaise.  He made it seem so easy!  So, I tried it.  Guess what?  It is easy!  After tasting it the first time, I swore NEVER to buy mayo again.

Being GF (gluten free), can sometimes be a tricky thing.  The biggest trap is sauces, dressings and marinades.  Soooo many of them contain "food starch" or "modified food starch".  This includes mayo.  And really, why is it so darned expensive??!?  Then there are all of those preservatives and things I can't even pronounce.  To top it all off, I rather enjoy different flavors (herbs, spices) in my mayo.  Ten years ago while on a missions trip to Ukraine, I was introduced to garlic mayonnaise.  Yummy!  I NEED FLAVOR!!  

For my vegan friends, I am still looking for a recipe.

My cute Rosemary bush.
So today, our mayo included; garlic (four large cloves), jalapenos (two, organic, from my garden) and fire oil.  This is an adaptation of Alton Brown's "Party Mayonnaise".  Experiment with different fresh herbs and spices.  Be creative, don't be shy.  Last time, the mayo included fresh rosemary.

This can be made in the food processor, on the lowest speed setting.  Three things to know ahead of time;

  1. The mayo will need to set out for TWO HOURS before refrigeration.  The lime juice and vinegar does something chemically to the egg (at room temp) that prevents salmonella.
  2. Add the oil SLOWLY at a small steady stream.  If it is poured in too quickly the mayo will not do its mayo thing. 
  3. Olive oil does not work.  The molecules do not do that mayo thing.

Ingredients

  • 2 TBSP  white wine vinegar
  • 2 TBSP lime juice
  • 1 whole egg 
  • 1 egg white
  • 1/2 tsp salt
  • 1 tsp dry mustard, heaping
  • 2 to 3 TBSP chile or fire oil
  • 2 C (minus 2 to 3 TBSP) corn oil or safflower oil
Directions

Place all ingredients, except the oil, in the food processor and blend well.  Turn on processor (low setting) and add the oil in a slow, steady stream.
Let the mayo sit at room temperature for two hours then refrigerate. This keeps for about 10 days. 

Here I am, I am here

my lovely Gloria in Haiti
So, I have this friend...  No, really.  My crazy, amazing, wacky friend Gloria.  She challenges me on a regular basis.  It usually starts off with her saying, "You know what you should do?  You should..."  My first thought is usually, "you're nuts"!  But by the time she is done speaking, I'm usually thinking that she's right.  I should.  

And so, I am.  

The Holy Spirit gets me into more projects that way.  But really, I love how the Lord uses my friends to grow me, to stretch me, to take me one step further.

Here is my blog.  I am not perfect, I do not have all the answers, I am not a master anything.  I do however, love learning new things and sharing what I have learned.  I am a follower of Jesus Christ.  I have a good sized veggie garden.  I adore canning.  My peeps tell me I am a rather good chef.  I sew, crochet & knit. I have sold some of my clothing in a small down-town boutique.  Nutrition and eating properly for our health is important to me.  I am celiac & maintain a strict GF (gluten free) diet, I would love to be ONLY organic but, alas, it is not in the budget at this time.  Lastly, saving money is a rather passionate hobby of mine.

This is an old pair of shorts turned into a modest skirt.  Doing this gets an extra season out of clothing that was headed to the donation pile.  My oldest got to wear a designer-origional-one-of-a-kind.  You go mom!